How to Install a Package of Bees:
Step-by-Step Guide for Ontario & Canada
📋 In This Article
- Package Bees vs Nucleus Colony — Which Should You Buy?
- Before Installation Day — What You Need Ready
- Best Time to Install in Ontario
- Step-by-Step Installation Guide
- What to Feed Immediately After Installation
- How to Check if Your Queen Was Accepted
- Your First 30 Days Timeline
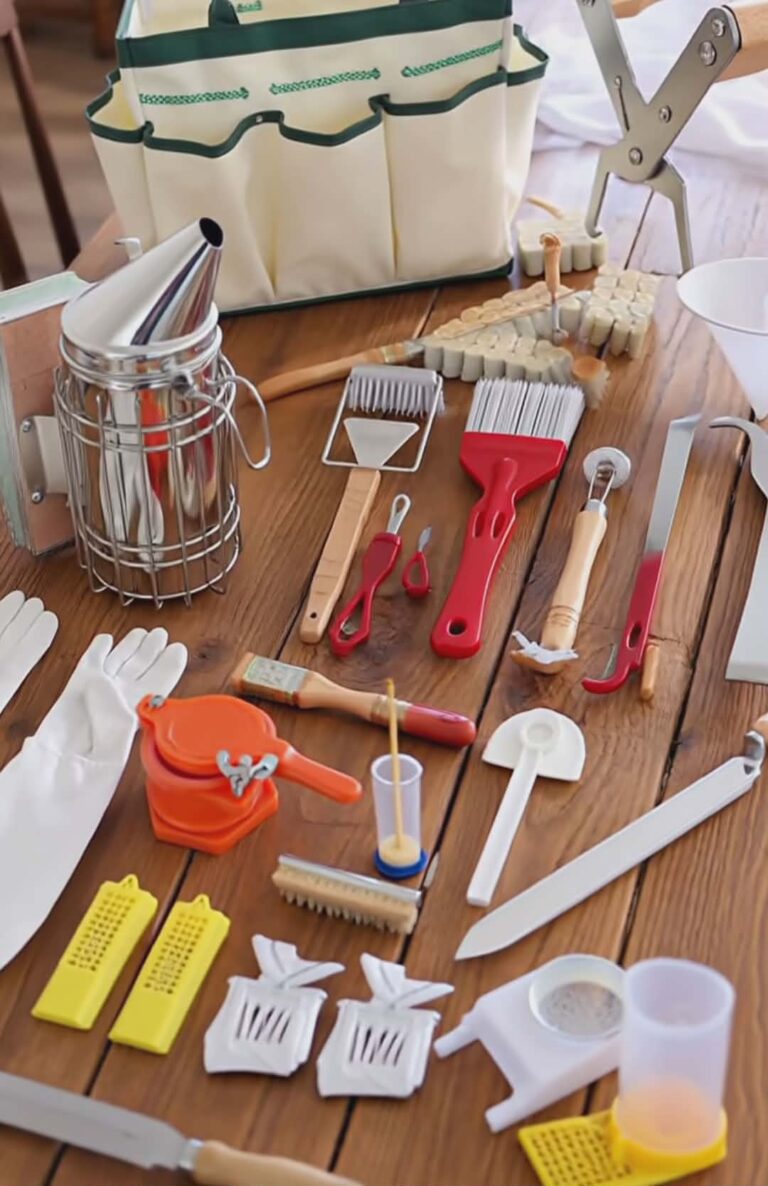
- Products You Need on Installation Day
Installing a bee package in Ontario for the first time is one of the most exciting moments in beekeeping — and one of the most nerve-wracking. This step-by-step guide walks you through everything from the moment your package arrives to your first queen check five days later.
Package Bees vs Nucleus Colony — Which Should You Buy?
Before we get into installation, it’s worth understanding the difference between a package and a nuc — because the installation process is different for each.
- Usually cheaper (~$150–$200 CAD)
- Widely available from Ontario suppliers
- Easier to ship long distances
- Fresh start — no old comb or disease
- Slower to build up — no existing brood
- Higher queen rejection risk
- More dependent on early feeding
- Already has brood, honey and pollen
- Queen is laying and accepted ✅
- Builds up 4–6 weeks faster than a package
- Much lower failure rate for beginners
- Costs more (~$250–$350 CAD)
- Sells out earlier — order by February
WiseBee Recommendation for Ontario Beginners
If budget allows, start with a nuc. Ontario’s short beekeeping season means a faster buildup translates directly to more honey and a stronger colony going into winter. A nuc that arrives in May can often fill two brood boxes before September — a package installed the same day rarely can.
Before Installation Day — What You Need Ready
✅ Installation Day Checklist — Have These Ready
- Your hive assembled and in its permanent location
- 10 frames with foundation installed in the brood box
- Smoker + fuel (burlap, wood pellets, or pine needles)
- Full suit, gloves, and veil on and zipped up
- Hive tool
- Spray bottle filled with 1:1 sugar syrup
- Entrance or frame feeder ready to fill immediately after
- Pollen substitute patty ready to place on frames
- Queen cage tool or small nail to remove cork
- A helper if possible — especially for your first time
Set Up Your Hive Location First — You Cannot Move It Later
Once bees learn the location of their hive, moving it more than a few feet will cause returning foragers to pile up where the old entrance was. Decide on your permanent hive location before installation day. Ideally face the entrance south or southeast for maximum winter sun exposure in Ontario.
Best Time to Install in Ontario
The ideal installation window for Ontario is late April to mid-May — specifically when daytime temperatures are consistently above 13°C and overnight lows are staying above 5°C.
Installing too early (before April 15th) risks cold nights killing a small package before it can build up enough bees to maintain cluster temperature. Installing too late (after May 20th) reduces your season and leaves colonies with less time to build winter stores.
Time of day matters too. Install in the late afternoon — between 4pm and 7pm. At this time, foragers are returning to the hive rather than leaving, which means the bees are calmer and more oriented to their new location from day one.
Step-by-Step Installation Guide
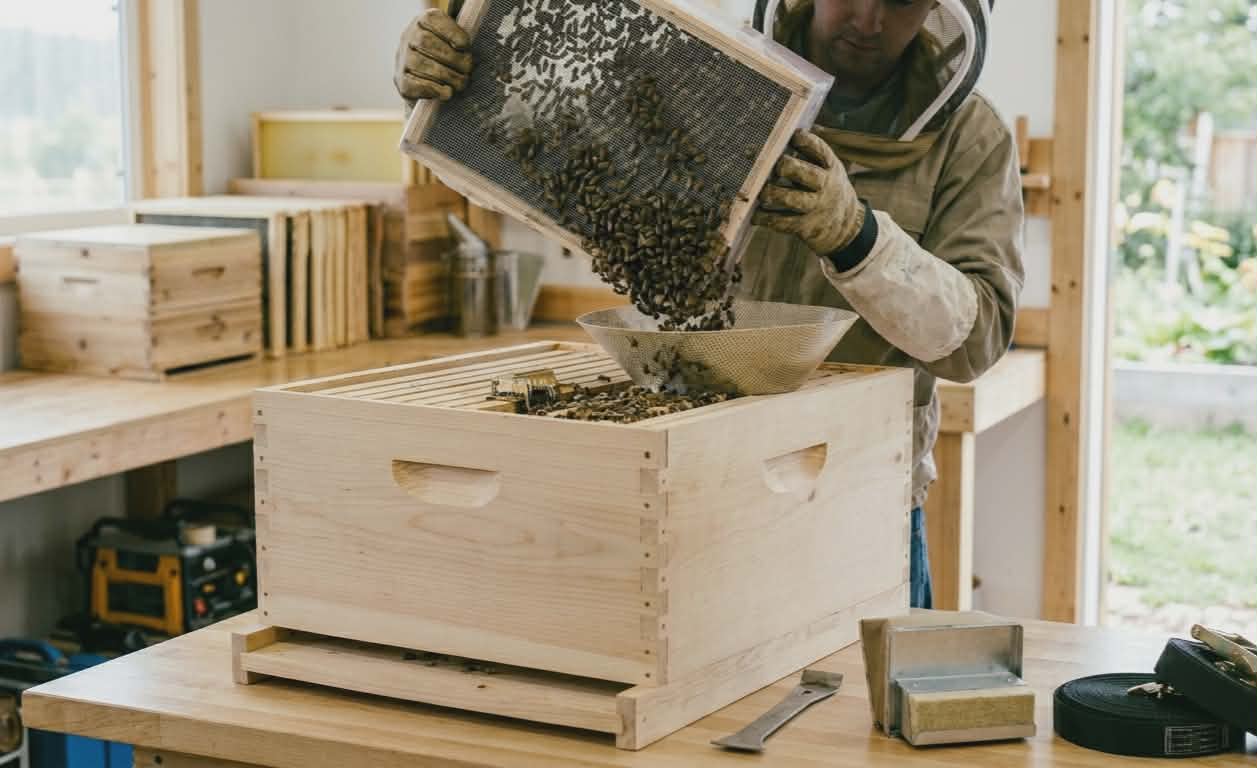
When you pick up your package from the supplier, you’ll receive a screened wooden or plastic box containing approximately 3 lbs of bees (roughly 10,000 bees) and a small queen cage suspended inside.
Transport the package in a cool, dark area of your vehicle — the back seat or trunk with a blanket over it works well. Keep them calm. If the journey is long, mist the screen lightly with water to keep bees hydrated. Do not leave the package in a hot car.
Place your hive on its stand in its permanent location. Set up one brood box with 10 frames. Remove 4–5 frames from the center of the box to create an open space where you will pour the bees. The space should be wide enough to accommodate a large cluster.
Light your smoker and have it burning well before you open anything. Apply 2–3 puffs at the entrance and under the lid before you start. Put on your full suit, gloves, and veil and zip everything securely.
Before opening the package, mist the bees thoroughly through the screen with your 1:1 sugar syrup spray bottle. Drenched bees are calm bees — gorging on syrup makes them less defensive and easier to work with. Spray until you can see bees licking syrup off each other through the screen.
Give the package a sharp downward knock on the ground to drop the bees to the bottom of the box. This clusters them together and makes the next steps easier.
Remove the lid or feeding can from the package — bees will start flying out, so work calmly and don’t jerk your movements. Reach in and locate the queen cage — it’s typically a small plastic or wooden cage about the size of your finger, suspended by a metal tab.
Gently pull the queen cage out and brush any bees off it. Look through the mesh to confirm the queen is alive and moving. If she is motionless, she may be chilled — warm her briefly in your hand before proceeding.
Use a small nail or toothpick to remove the cork or wax cap from the candy plug end of the queen cage — do NOT remove the cork from the other end. The candy plug allows bees to gradually eat their way to the queen, giving them time to accept her pheromones before she’s released.
Hang the queen cage between two central frames, candy plug facing down, with the mesh facing toward the open space where you’ll pour the bees. The cage should be at mid-frame height — not at the bottom where it could get covered by bees and suffocate her.
WiseBee Tip: Candy End Down
Always install the queen cage with the candy plug facing downward. If a queen dies in the cage, her body will block the exit if the candy end is up — worker bees cannot remove her and will be trapped. Candy down means gravity helps clear any blockage.
Give the package another sharp knock to cluster the bees at the bottom. Hold the open package over the center space in the brood box and pour the bees in — shake firmly and steadily. Most bees will pour out in a cluster. Don’t worry about getting every single bee — those remaining in the box will find their way into the hive on their own.
Gently slide the removed frames back into position, taking care not to crush bees between frames. Move slowly and smoothly. Close the hive with the inner cover and outer cover.
Reduce the hive entrance to the smallest setting on your entrance reducer for the first week. A small package of bees cannot defend a full-size entrance against robber bees from other colonies — and in April/May in Ontario, robbing pressure from overwintered colonies is significant.
Leave the empty package box near the hive entrance for 24 hours — remaining bees will smell the queen pheromone and walk into the hive on their own.
What to Feed Immediately After Installation
Feeding immediately after installation is not optional — it’s critical. A fresh package has no honey stores and no drawn comb. Without supplemental feeding, they will struggle to build wax, raise brood, and establish before the first nectar flow.
1:1 Sugar Syrup — Start Immediately
Mix equal parts white sugar and water by weight. Fill your feeder immediately after closing the hive. The 1:1 ratio mimics nectar and encourages wax building and brood rearing. Refill every 2–3 days — a new package can consume a liter of syrup per day in warm weather.
Pollen Substitute Patty — Place on Day 1
Place a Global Patty or pollen substitute patty directly on top of the frames before closing the hive. New packages need protein to raise brood and the patty provides this even before natural pollen is reliably available. Replace when consumed.
WiseBee Tip: Frame Feeder Over Entrance Feeder in Spring
In cool Ontario spring weather, an entrance feeder exposes syrup to cold temperatures — bees may not collect it efficiently. A frame feeder or hive top feeder keeps syrup at hive temperature and dramatically reduces robbing pressure from other colonies. Worth the small extra effort on installation day.
How to Check if Your Queen Was Accepted
Five days after installation, do your first inspection specifically to check on the queen. This is one of the most critical checks in beekeeping — a rejected or dead queen means your package will fail without intervention.
What you’re looking for:
Check 1 — Is the queen cage empty? Carefully remove the queen cage from between the frames. If the candy plug has been eaten through and the cage is empty, the queen has been released. This is what you want to see.
Check 2 — Are there eggs? Look at the frames nearest where the queen cage was hanging. With a flashlight, look for tiny white eggs standing upright in the base of cells — they look like miniature grains of rice. Eggs mean the queen is laying. This is your confirmation of successful acceptance.
Check 3 — Can you spot the queen? The queen is longer than workers with a more tapered abdomen. She’s often surrounded by a circle of attendant bees facing her. If you find her and she’s moving normally, you can close the hive — you don’t need to find eggs as well.
What to Do if the Queen Was Not Released or Is Dead
If the candy plug is still intact after 5 days, carefully release the queen manually by removing the plug — but only if the bees on the cage appear calm (gently grooming the cage rather than biting it aggressively). If the queen is dead, contact your supplier immediately — most Ontario bee suppliers will replace a dead queen within the first week.
Your First 30 Days Timeline
All Products You Need on Installation Day
Final Thoughts
Installing your first package of bees is a milestone moment — and it’s simpler than it looks once you’ve done it. The keys for Ontario beginners are timing (late April to mid-May), immediate and consistent feeding, patience during the first 5 days, and a calm, confident queen check on day 5.
Most packages that fail do so because of one of three reasons: installing too early in cold weather, not feeding enough in the first two weeks, or opening the hive too soon and disturbing queen acceptance. Avoid these three mistakes and your colony will reward you with a thriving summer. 🐝🍯
You’ve Got This
Thousands of Ontario beekeepers install their first packages every April and May — and most succeed. Follow this guide, be patient, feed consistently, and trust the bees. They know what to do.
Questions about your installation? 🐝
Ask our AI beekeeping assistant — get instant advice specific to your situation, your location in Ontario, and your hive setup.
🐝 Ask Bee Now — It’s Free🐝 WiseBee Disclosure
Affiliate Disclosure: This article contains Amazon affiliate links. If you purchase through our links, we earn a small commission at no extra cost to you. Learn more →
Disclaimer: This article is for educational purposes only and does not constitute professional apicultural or veterinary advice. Always consult a qualified beekeeper for guidance specific to your situation. Full disclaimer →