Wintering Bees in Northern Canada:
The Long-Winter Survival Guide
📋 In This Article
- The Northern Canada Challenge — What Makes It Different
- Indoor Wintering — The Professional Standard
- Outdoor Wintering — Arctic-Grade Insulation
- The March-April Gap — Preventing Spring Starvation
- Late Spring Buildup — Cheating the Calendar
- Regional Timing Comparison Table
- Extended Wintering Checklist
- Products for Northern Canada Beekeepers
Beekeeping in northern Canada — Yukon, Northwest Territories, and the northern regions of Alberta, Saskatchewan, and Manitoba — is a different discipline entirely from beekeeping further south. When spring can arrive in June and winter sets in by September, the challenge isn’t just surviving the cold. It’s surviving the duration.
The Northern Canada Challenge — What Makes It Different
Southern Ontario and Alberta beekeepers face winter seasons of roughly 5–6 months. Northern Canadian beekeepers face extended wintering periods of 7–9 months — and in the Yukon or NWT, colonies may be completely isolated from natural forage for the better part of a year.
The fundamental problem of northern beekeeping is not temperature — it’s duration of isolation. A colony that burns through its food stores in February in southern Ontario can be emergency-fed relatively easily. A colony that exhausts its stores in March in the Yukon may have no accessible forage for another 10–12 weeks. Starvation prevention is the defining challenge of northern Canadian beekeeping.
The Extended Wintering Problem
In northern Canada, colonies begin raising brood in late February or early March — triggered by lengthening days, not temperature. This massively increases food consumption at a time when the beekeeper often cannot safely open the hive and natural forage is months away. Without emergency feeding provisions installed in autumn, colonies can starve with snow still on the ground in April.
Indoor Wintering — The Professional Standard
In northern Alberta, Saskatchewan, Manitoba, and especially in the Yukon and NWT, professional and semi-commercial beekeepers do not winter their colonies outdoors. Instead, hives are moved into environmentally controlled storage facilities — insulated buildings maintained at a constant 4°C to 5°C throughout winter.
Why Indoor Wintering Works
At 4–5°C, honeybee colonies maintain a loose, relaxed cluster. Bees are not actively generating heat as they do in a tight outdoor winter cluster, which means food consumption drops dramatically — sometimes by 30–40% compared to outdoor wintering. A colony that would consume 40kg of stores outdoors may survive on 28–30kg in a properly controlled indoor facility.
Indoor Wintering Facility Requirements
An indoor wintering facility needs: stable temperature between 3°C and 6°C (fluctuations trigger cluster activity and food consumption), adequate ventilation to prevent CO₂ buildup, complete darkness (light triggers flying behavior), and humidity control. Commercial beekeepers in northern Alberta often use retrofitted grain bins or purpose-built insulated structures. For hobbyists, a well-insulated garage or outbuilding can work if temperature can be maintained.
Moving Hives Indoors — Timing
Hives should be moved indoors after the first hard frost has stopped all flying — typically mid to late September in northern regions. All fall feeding, Varroa treatment, and mouse guards must be complete before moving. Once indoors, hives should not be disturbed except for emergency food checks.
Moving Hives Outdoors in Spring
Bring hives outdoors on a warm, calm day when temperatures will be above 10°C for at least several hours. In northern Alberta and Saskatchewan, this is typically early to mid-May. In the Yukon and NWT, it may be late May or even early June. Move colonies to their outdoor location in the evening or early morning when bees are calm, and place them facing south or southeast to catch maximum spring sun.
WiseBee Tip: Cleansing Flights After Indoor Wintering
After months indoors, bees are desperate for a cleansing flight to void their intestinal tracts. Choose the first warm day above 10°C to bring hives outside — bees will fly immediately and heavily. This is normal and healthy. Provide fresh water nearby, as dehydration after indoor wintering is a real risk. A shallow dish with stones for landing will suffice.
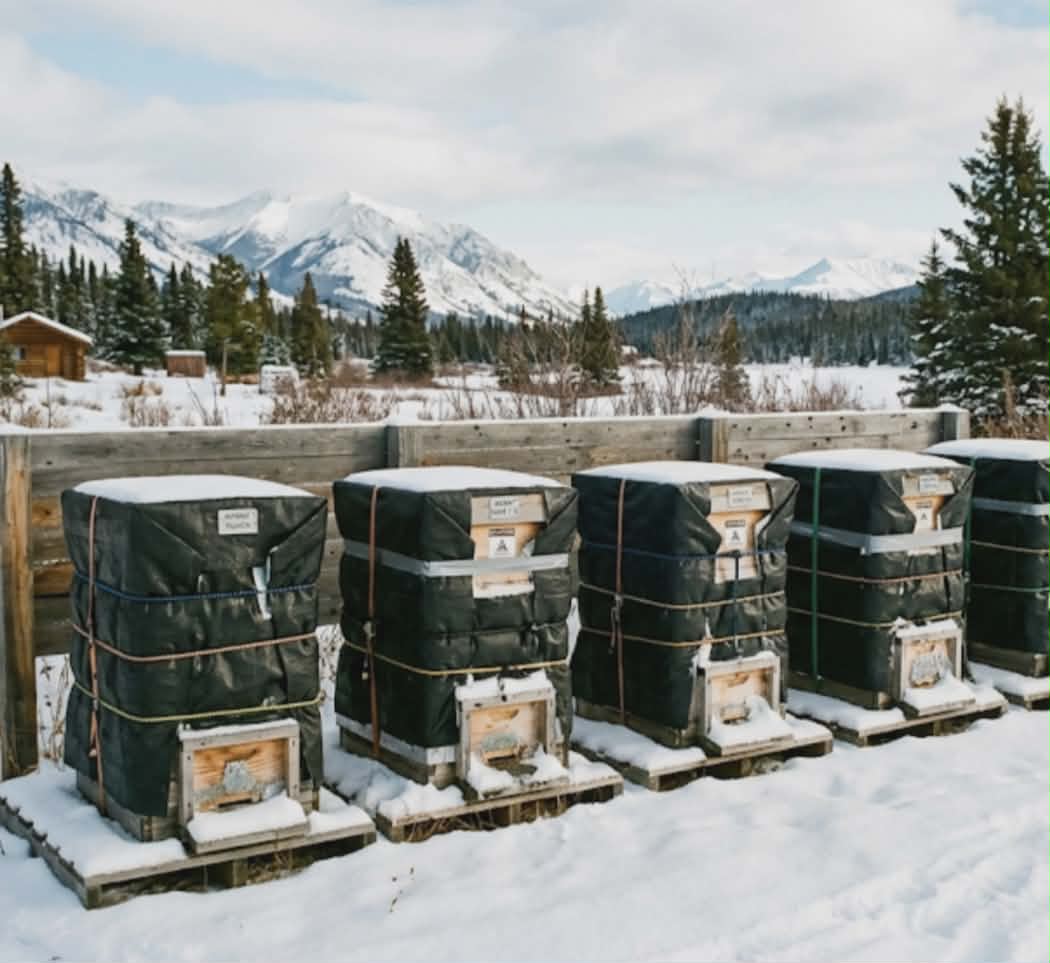
Outdoor Wintering — Arctic-Grade Insulation
For beekeepers who cannot access indoor wintering facilities, outdoor wintering in northern Canada requires insulation significantly beyond what works in Ontario or southern Alberta. Standard Bee Cozy wraps are inadequate for sustained -40°C or colder conditions.
Arctic-Grade Insulation Strategy
Sides: Minimum 2 inches of extruded polystyrene (XPS) foam on all four sides, in addition to a hive wrap. XPS provides approximately R-10 per 2-inch thickness. Polystyrene hives (Apimaye or equivalent) with their built-in insulation are significantly better than wooden Langstroth hives for extreme cold outdoor wintering.
Top: At least 4 inches of XPS foam above the inner cover — heat rises and top insulation has the most impact on cluster heat retention. R-20 minimum at the top is the standard recommendation for northern outdoor wintering.
Bottom: A solid bottom board (not screened) is essential for extreme cold — screened bottom boards allow too much cold air flow at temperatures below -30°C.
Moisture Quilts — Non-Negotiable
In northern Canada’s cold, dry conditions, the moisture quilt is even more important than in Ontario. Condensation that forms inside a cold hive can freeze solid on the inner cover and then drip ice-cold water onto the cluster during brief warm periods — a fatal combination. A thick moisture quilt of wood shavings or burlap above the inner cover is mandatory for outdoor northern wintering.
Windbreaks for Northern Apiaries
In open northern landscapes, wind chill can reduce effective temperatures by 10–15°C below ambient. Position hives against a north-facing windbreak — solid fence, dense evergreen hedge, or building — that blocks prevailing winter winds. In truly exposed locations, individual hive windbreaks made of straw bales around each hive provide significant protection at low cost.
The March-April Gap — Preventing Spring Starvation
The most dangerous period for northern Canadian colonies is not the depth of winter — it’s the late winter gap when brood rearing accelerates but forage is still 6–10 weeks away. This “March-April Gap” kills more northern colonies than the coldest January nights.
Here’s what happens: lengthening days in late February trigger the queen to begin laying. By March, brood rearing is ramping up rapidly, requiring significantly more food than the winter cluster alone. But in northern regions, the first natural pollen — from willows or dandelions — may not arrive until late May or June. The colony burns through its remaining stores feeding hungry larvae in April while snow still covers the ground.
Minimum Food Stores for Northern Canada
A colony in northern Alberta, Saskatchewan, or Manitoba needs a minimum of 40–45 kg of honey or processed sugar syrup to survive until June forage. In the Yukon or NWT, plan for 45–50 kg. Weigh your hives in September before wrapping — if they are light, feed aggressively until they stop taking syrup, then supplement with candy boards as emergency insurance.
The Candy Board Solution
Every northern Canadian colony should have a candy board or large fondant supply installed above the frames in October — before outdoor temperatures make hive opening dangerous. The candy board provides emergency carbohydrate reserves that bees can access without the beekeeper needing to open the hive in -30°C conditions.
For northern regions, use a larger candy board than standard Ontario recommendations — at least 2–3 kg of candy per hive, and consider checking and replacing it in late February or early March if possible on a warm day.
Late Spring Buildup — Cheating the Calendar
Northern Canadian beekeepers must “cheat the calendar” — stimulating spring colony buildup artificially before natural resources are available. Without intervention, colonies that were brought outdoors in May may not have adequate foragers until July, leaving only a narrow window before the next winter preparation begins.
Pollen Substitute Patties — The Northern Spring Essential
Begin placing pollen substitute patties on top of frames as soon as colonies are brought outdoors — or even while still indoors in late April. These protein patties stimulate the queen to begin laying at maximum rate and give nurse bees the resources to raise healthy brood weeks before natural pollen is available.
The Northern Spring Feeding Protocol
As soon as outdoor temperatures allow (above 10°C): Place pollen substitute patties directly on frames. Begin 1:1 sugar syrup feeding to stimulate brood rearing. Continue both until natural pollen and nectar flows are established — typically when willows and dandelions are actively blooming in your area. Don’t stop early — the more buildup you can achieve before the main flow, the better your honey harvest.
Early Willow and Dandelion Forage
In northern regions, willows are often the first significant pollen source — blooming as early as May in some northern Alberta locations, or as late as June in the Yukon. Dandelions, normally the Ontario beekeeper’s first reliable flow, may not appear until late May or June in northern regions. Understanding your local bloom calendar is essential for planning when to reduce supplemental feeding.
Regional Timing Comparison Table
| Region | Install Winter Protection | Remove Protection | First Inspection | Min. Stores Needed | First Natural Forage |
|---|---|---|---|---|---|
| Southern Ontario | Mid-October | Early April | Mid-April | 30–35 kg | April (dandelion) |
| Southern Alberta | Mid-September | Early May | Late April | 35–40 kg | May (dandelion) |
| Northern Alberta / SK / MB | Early September | Mid-May | Mid-May | 40–45 kg | Late May (willow) |
| Yukon / NWT | Mid-September | Early June | Early June | 45–50 kg | June (willow/dandelion) |
Extended Wintering Checklist — Northern Canada
✅ August — Critical Preparation Month
- Complete Varroa treatment immediately after last honey harvest
- Begin heavy 2:1 sugar syrup feeding — feed until bees refuse
- Assess colony strength — combine weak colonies now
- Install mouse guard by September 1st
- Order all winter supplies — candy boards, patties, insulation
✅ September — Final Preparation
- Oxalic acid vaporization when colony approaches broodless state
- Install candy board above frames as emergency food reserve
- Install hive wrap + top insulation (4 inches XPS minimum)
- Install moisture quilt above inner cover
- Confirm upper ventilation is open but protected from snow entry
- Reduce entrance to smallest setting
- Heft all hives — minimum weight confirmed?
- Indoor wintering: move hives to storage facility after first hard frost
✅ October–April — Minimal Intervention Period
- Check entrance monthly — clear ice or snow blockage if present
- Listen at entrance on mild days — cluster hum = alive ✅
- Heft hives monthly — add candy board if colony feels light
- Do NOT open hive unless emergency feeding is absolutely required
- Indoor wintering: check temperature and ventilation monthly
✅ May/June — Spring Emergence
- Bring hives outdoors on first warm day above 10°C
- Place pollen substitute patties immediately on top of frames
- Begin 1:1 sugar syrup feeding
- Remove winter wrapping and insulation
- First full inspection when temperature consistently above 13°C
- Check queen presence and brood pattern
- Monitor Varroa — spring mite levels before treatment threshold?
Products for Northern Canada Beekeepers
For our complete guides on spring management after a northern winter, see our March Beekeeping Guide and Spring Package Installation Guide. For Ontario and Alberta specific overwintering, see our Ontario & Alberta Overwintering Guide →
Managing bees in the far north? 🐝
Ask our AI beekeeping assistant — tell us your region, your setup, and your wintering method and we’ll help you build the right strategy for your extended winter conditions.
🐝 Ask Bee Now — It’s Free🐝 WiseBee Disclosure
Affiliate Disclosure: This article contains Amazon affiliate links. If you purchase through our links, we earn a small commission at no extra cost to you. Learn more →
Disclaimer: This article is for educational purposes only and does not constitute professional apicultural or veterinary advice. Always consult a qualified beekeeper for guidance specific to your situation. Full disclaimer →